Monday, 30 September 2013

Raspberry lolly birthday tart

Just like a raspberry tart, only chewy.

So, this one time? In my kitchen? My BFF and I were joking around that it would be cool to make a French tart with lolly raspberries instead of real ones. And then we made it come true, because he requested one for his birthday. 

I made the tart just like my previous version, which you can find here. I then used raspberry lollies to fill it, and topped it off with icing sugar.

Raspberry lollies.

The best part of using lollies rather than real fruit was that they were all identical in size, meaning that they all lined up perfectly. If you want to make this yourself, you need three of the small bags that you get at the supermarket.

I didn't actually end up eating any of this tart, but it looked very pretty and didn't last very long. Birthday boy was very happy.

Happy birthday!

Friday, 27 September 2013

Double chocolate cupcakes

Nothing says "Happy Birthday" like chocolate cupcakes.

My friend had a birthday recently and I promised to make her some cupcakes. These make a great gift - personalised, handmade, and delicious. They're always going to taste better than store-bought cakes too. 

Baking your cupcakes in a muffin tray helps them to rise neatly.

In order to make your cupcakes look really professional, and like a gift, you can purchase cupcake boxes for a few dollars from specialist cake stores. There are a few of these in Sydney, and some operate online. There is also eBay for boxes and other cupcake supplies. With a ribbon around them, they look beautiful. 

Totes profesh.

In terms of a recipe for these, I just use my standard vanilla one, and throw in some cocoa. I don't measure it, I just keep adding it until I decide it's chocolatey enough. If the mixture seems too dry due to the extra dry ingredient, you can add more milk. 

The icing is regular buttercream with liberal amounts of cocoa also. A bit of thickened cream is particularly nice in chocolate buttercream; it gives a nice gloss and texture. 

So simple, but so good.

Thursday, 26 September 2013

Crazy cupcake lolly tower!

Nerds, snakes and marshmallows, oh my!

I made this last weekend but I didn't upload the photos to my computer until tonight. Since pink cupcakes are so pretty, I thought it was worth posting a few pics. 

I made this for my little sister, who just got engaged. If you've read this before you'll know that I made a love tart for my other sister's engagement recently. Love is in the air! My littlest sister loves lollies, so I had to incorporate them into her engagement treat. 

I made two dozen vanilla cupcakes with pink buttercream icing. Some I decorated with sprinkles and some with pink love hearts. All of them got glitter. 

The next day I assembled the whole thing. I wasn't quite sure exactly how it was going to look but I had a vague idea. Most importantly I had plenty of pink and red lollies at hand. After a lot of prodding and careful placement and making sure that all superfluous lollies were eaten, I had made our centrepiece!

The best thing about this was that it was so interactive. We all sat around the table talking and laughing while we picked out the lollies and tried to pretend we weren't having second helpings of cake. 

Was a lovely evening : ) 

Congratulations!

Farfalle with lamb ragout, mint and ricotta

A classic dish with some interesting twists...

This is one of those recipes where there are a million different versions and it's slightly overwhelming if you're cooking it for the first time. I had lamb mince in the fridge, so I did some googling and came up with this recipe as a basis.

I've only had beef ragout with rosemary before; this recipe interested me because it also contains ground coriander, fennel seeds and cumin along with fresh rosemary, mint and thyme. I have all of these except the fresh thyme, so dried had to suffice this time.

Fresh mint was a bit of a challenge however as my poor mint plant was viciously attacked by two caterpillars last week. It's amazing how many leaves such small creatures can plow through in less than 24 hours.

I followed the recipe fairly closely, so there is nothing particularly innovative in this post. I was supposed to put a carrot in, but I ate it instead. I didn't bother with the celery. I used red wine vinegar instead of red wine. I cooked the meat within the sauce and let it simmer for longer. (This keeps the meat soft and stops it from clumping - thanks to a certain lady for this tip!)

Adding the pasta into the ragout.

I was fairly conservative with the spices, measuring them out exactly. It's not a combination that I'm used to using in a European dish so I didn't want to overdo it.

Because my mint was looking quite poorly, I threw the half-eaten leaves into the pot. I kept the pretty ones for the garnish.

I definitely think it was worth choosing the recipe with the extra spices. They weren't difficult to add in and the taste is amazing.

Something else to add: I always was confused re: ragu versus ragout. Apparently they're one and the same, the former being Italian and the latter being French. Mystery solved.


Definitely worth adding this to your repertoire.

Thursday, 19 September 2013

Handmade ravioli with roast zucchini, toasted pine nuts and goat cheese

Freshly made from scratch!

So... I haven't blogged for a while, but that's not because I haven't been cooking. I've cooked a few repeat dishes like the salted triple caramel cupcakes, chocolate cupcakes and tonnes of fettucini. 

Homemade pasta is just so good. I have been practicing a lot with my pasta rolling machine, and still have a long way to go before I can roll out one of those perfect looking pieces that are about 10 foot long.


Flour and egg, that's it. I use Italian "00" flour.

Ravioli is a bit tricker. I actually have an attachment for my pasta machine that punches out (ostensibly) perfect pockets of pasta. But in order to achieve this, you must have a rather long and perfectly symmetrical piece of pasta. Enough said. 

I've actually found it easier to make the ravioli by hand. This is much more forgiving because you can use your imperfect piece of pasta, cut it with a pasta roller (or even a pizza cutter), then use these smaller but perfect pieces to create your ravioli. 

There are lots of ways that you can do it; these ones were made from rectangles of pasta filled, and then folded in half. Google will reveal endless possibilities - and also a rather perplexing video of a corpulent American man demonstrating his technique whilst wearing sandals with socks. 

I digress. 

As far as fillings go, the possibilities are endless. And, because we live in Australia, there is no need to be traditional whatsoever! So far I've made a feta, kalamata olive and cauliflower filling and a simple roast pumpkin one.

The filling for these ravioli was roasted zucchinis, toasted pine nuts and my favourite French goat cheese.


Roast zucchini with red onion and garlic.

I roasted the zucchini with garlic and onion, then used a stick mixer to partially pulverise it. The pine nuts were pan fried, drained on a paper towel then crushed with a mortal and pestle. I crumbled the cheese by hand and added it last. 

The filling should be as dry as possible and not come directly out of the fridge or be too hot. Excess moisture will leave your ravioli soggy. 

Once you have your chosen filling, use a teaspoon to spoon it into whatever ravioli design you chose. I found that a small amount of water helped to seal the edges. Don't use too much though. 

I decorated the edges of each piece with a crinkled edged vegetable cutter that I bought for unknown reasons. It's pretty lame. But it did make the edges of the ravioli look pretty. 

Once each piece is finished, place it on a floured tray. A bit of extra flour sprinkled on top helps to keep it dry. I'm still figuring out the exact timing on the drying process but I know it can be left out overnight and can also be frozen.


Pasta after drying overnight.

Cook in the usual fashion... and then serve with some nice olive oil, salt, pepper and grated parmesan. It really doesn't need a lot to taste great.


Eat, and eat well.

Saturday, 7 September 2013

Spatchcock in white wine jus with cauliflower purée and toasted pistachio crumbs

Spatchcock with cauliflower and pistachios

I've been wanting to cook spatchcock for a while now. I've eaten it a few times and noticed that my local IGA stocks them. 

I'm not great with cooking meat. I'm a bit squeamish and also inexperienced. It's a bit difficult when living alone too - can't exactly cook a roast and eat it all on my own! 

But I definitely want to get past the fear, so I thought that a spatchcock was a good place to start. It's small and not too daunting.

My main concern was ripping it all apart, and ensuring that it was cooked through. Thank god for YouTube. I learnt how to quarter the bird in this way... it wasn't as bad as I thought.

The worst part was that my spatchcock had a neck. Ew!

Anyway, once I had the wings, drumsticks and breasts in separate pieces, I covered them with a garlic, olive oil and butter rub, and sealed them briefly in a pan. 

I had decided to finish off the meat in my French oven. After lightly cooking some garlic and onion in olive oil in there, I added some white wine and then the spatchcock pieces. 

With the lid on, these cooked for about 15 minutes. 

French oven cooking.

In the meantime, I had toasted then finely chopped some pistachios. These were to add some extra texture and flavour to the dish.

I also prepared a cauliflower purée. This is pretty easy and tastes great. Cook the cauliflower in a mixture of milk and water on the stovetop. Add in some onion and garlic and season. When it is cooked, drain off the liquid and purée the rest. You can do this with a blender or a stick mixer. 

Once the spatchcock was cooked through, I took it out and placed it in a warm pan. I brought the remaining liquid in the French oven to the boil and let it reduce somewhat. This was then strained to form the jus and poured over the spatchcock. 

To serve, I filled a bowl with the purée, then sprinkled the pistachio crumbs on top. I used some of the soft onion and garlic pieces removed from the jus as a bed for the spatchcock. These added some nice flavour. 

Finally I arranged the spatchcock on top of the purée, topping it with a few more onions and garlic and seasoning with some pepper.

Purée is always a bit tricky... when you go to a restaurant, you are usually given a thin swipe on the plate. For a "real" dinner, you usually want a bit more than that. I've served it on the side before, in a ramekin, which I may do next time. This prevents the meat from sinking into the cauliflower. More of a logistical issue than anything else though! Tastes great either way. 

Slightly difficult to eat but tasty nonetheless.

Wednesday, 4 September 2013

Salted triple caramel cupcakes

The ultimate salted caramel experience.

Yep, cupcakes again.

Before I start, I must give credit for the majority of this recipe to Sally's Baking Addiction. Her recipe is here

For my cakes, I used my standard vanilla cake mix, but substituted the caster sugar that I normally use for dark brown sugar. 

Caramel cakes!

I followed the icing recipe pretty much exactly, except that I added some vanilla extract and was a bit more liberal with the butter and cream than I was with the sugar. 

I was, in fact, so liberal with the butter that for a while there the icing was not technically icing. Turns out there is such a thing as too much butter. After some extra cream and icing sugar were added to a reheated mixture, it came good. Crisis was averted. 

Technically this isn't actually icing - it's just caramel.

Because the icing was so thick and buttery, I had trouble squeezing it through a piping nozzle. Every time I tried, I had a blowout. So I iced these with a piping bag only. You can do this by cutting off the tip and using it as you would normally.

Once they were iced, I sprinkled some finely ground sea salt on top, and added a chewy caramel lolly. 

Werther's Original Caramel Chews as cake toppers, chopped in half, salted and slightly melted

Some tips I thought of today while baking: 
  • Always cook cupcakes with the liners sitting in a muffin tray. This ensures that they come out of the oven in a nice shape, and don't spill over the edges, etc. 
  • When filling your cupcake cases, it is easiest to do so with a jug. I always end up making a huge mess if I try and use a spoon. Use a spatula to guide the mixture into the cases. 
  • If you do spill any around the inside edge of the cases, use a fork to gently push the excess mixture down into the case. Remember - when the cakes rise, they're likely to cover up any mistakes anyway. 
That's all. Now stop salivating and start baking!

You know you want one.

Monday, 2 September 2013

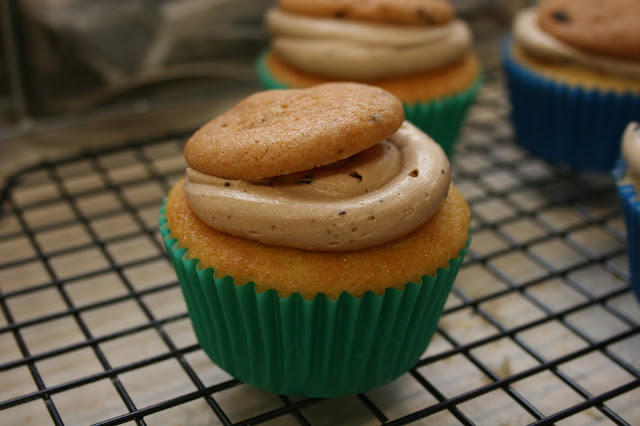
Choc chip cookie cupcakes

Cupcakes with a cookie on top!

I've been meaning to make some sort of cookie dough-themed cupcake for a while now. I wasn't exactly sure how to incorporate the cookie dough. A major First World dilemma, I know. 

Do I put it inside the cupcake? Would it be soft enough? Do I put some in the icing? Can I turn it into icing? I decided to experiment with the latter idea. 

I didn't bother making cookie dough from scratch. I find it's better to cheat when experimenting as you can easily end up spending a lot of money on something that isn't really edible. So, I bought one of those pre-made rolls of cookie dough at the IGA. 

I came home and made a standard batch of vanilla cupcakes and got them underway in the oven. 

Then, using my stick-mixer-food-processor-thingie, I creamed the cookie dough with a bit of milk. I then added it to creamed butter, and worked in icing sugar until the mixture was stiff enough for piping.


An extra picture... just cos. 

Because some of the chocolate chips were still intact, I couldn't use any of my piping nozzles to apply the icing. If there are any lumps or bumps in your buttercream, they will snag in the nozzle and you'll end up with some strange results. 

A piping bag can be used sans nozzle however, so I applied the buttercream via a bag with the end cut off. This created a neat swirl. 

In the meantime, I'd used part of the cookie dough to bake actual cookies. I made them as small as possible and cooked them until they were nice and crisp. As you can see in the pictures, I placed them on top of the icing, at a slight angle. 

Thus, I have created the choc chip cookie cupcake!

Chocolate chips don't need to get in the way of neat piping.