Friday 30 August 2013

Mulberries!

Something whimsical and sweet.

I walked up to the Harris Farm Market at Spit Junction today to buy a pomegranate (as you do) and I found the most exciting thing ever.

Mulberries!

I literally do not think that I have had these since I was about ten years old. My grandmother used to have a huge tree in her yard, so they were all-you-can-eat back then. 

That's all I have to say really! And no, I'm not going to make mulberry cupcakes, in case anyone was wondering. I'm eating them right now.

Childhood in a punnet

Thursday 29 August 2013

Handmade fettucini with sautéed greens, feta and mint

Fresh, zesty pasta.

Today I decided that I needed to learn how to make bread. And pasta. Bread = another post. Pasta = this post. 

I bought a pasta machine yesterday, so I was keen to try it out. It wasn't too tricky, just a question of making sure that the pasta dough had the right balance of flour and moisture. It's pretty cool when the pasta rolls out of the machine and actually looks like pasta!

Real pasta!

The next test was seeing whether or not it would hold when cooking. I was worried that it might all fall apart, but it boiled up nicely. 

For the pasta "sauce", I used olive oil, Sangiovese verjuice, lemon juice, lemon zest, garlic, salt, pepper and ground Nigella seeds. 

Nigella seeds are the little black spots you sometimes see on Turkish bread. They have quite a strong, earthy, salty taste and added a lot of flavour to the dish. 

To go with the pasta, I prepared some sugar snap peas, broccolini sprouts and fresh mint from my garden. These were sautéed in order to keep a bit of crunch and their bright colour. I then added some crumbed imported Greek feta that I splurged on today (I love my IGA!). It was worth it - absolutely delicious. 

Last of all, I added shaved parmesan and some extra mint leaves as a garnish.

The result was a light and tangy pasta with a nice kick to it. The mint added a few extra highlights and kept it nice and fresh.

My new pasta machine, now covered in flour.

Wednesday 28 August 2013

Oreo cupcakes

Mmmm... Oreos!

I have had a cold recently and have been itching to get back into the kitchen. Today I felt well enough to make some cupcakes. Hooray!

So, Oreo cupcakes. These are pretty easy and a little bit amazing. You need everything you'd use for a basic vanilla cupcake recipe, two packs or Oreos, one tub of mini Oreos and some cocoa. 

You also need a food processor or similar to grind the Oreos into crumbs. Once you have this, you can add it to the cupcake mixture itself, and the buttercream. I also added a bit of cocoa to the mixture to make sure it was nice and chocolatey.

The batter was very thick and chocolatey with chewy bits of Oreo throughout.

The cake mixed with crumbed Oreos has a lovely slightly chewy texture, and the whole thing definitely tastes like an Oreo.

Yummy chocolate cakes ready to ice.

The mini Oreos are perfect as decorations once you've iced them. I decided to do these ones in what is apparently the French piping style. 

I have to go now because now that I've written this and edited the photos I really do need to eat another one... quality control, etc. Yum.

I won't lie. These are GOOD. Go make them!

Saturday 24 August 2013

Chicken, zucchini and eggplant lasagne with wholegrain mustard

It was time to cook again so I decided to make a chicken lasagne. I'd found a recipe in one of Mum's cook books (thank you Woman's Weekly) and adapted it from that. 

It was originally meant to be chicken and leek. But I had no leeks. I did have zucchini and eggplant though. The rest is history. Here is Mr Lasagne before I put him in the oven:

I've never actually made lasagne before, so preparing this was pretty exciting.

I'm not sure when my lasagne became a "he" but it's not worth dwelling on such details at this point. 

Here is Mr Lasagne post-oven:

Unlike most people, I don't like my cheese overly brown. Yes I know I'm weird. 

Below is my dinner. That's all really. Was nice to have the vegetables in the middle of the chicken layers; made it lighter and obviously healthier. Worth experimenting with other combinations methinks.

It's hard to plate up lasagne nicely, but I did my best.

Friday 23 August 2013

Raspberries and cream cupcakes

Raspberries and cream cupcake.

I had a request for some cupcakes this week - raspberries and cream for my brother-in-law-to be. They're the kind of flavours he likes and it's one of my favourite recipes. 

They're not overly complicated to make. Take a basic butter / vanilla cupcake recipe and thrown in a handful of raspberries once you've made the batter. Frozen ones work well as they're either brittle (frozen) or soggy (defrosted). They break down quickly when beaten. 

Set aside a dozen raspberries with decent colour and form, and place on paper towels to defrost and dry. 

After you've removed your cakes from the oven, allow them to cool a little, then use a sharp knife to scoop out a raspberry-sized hole in the top of each. I find a steak knife is good for this. 

At this point you can enact some quality-control by eating the pieces of cake you remove. This is the cupcake equivalent of donut holes. 

Place a raspberry in each cupcake. This will mean that when you bite into the cake, you'll get a burst of tart sweetness below the creamy icing. 

Secret raspberries.

The main problem I have with these sort of cakes is that too much fruit means that the paper cases will start to separate from the cupcakes. This also means that they taste amazing. It's really a fine balance - aesthetics versus taste. First world problem.

Once you've got your secret raspberries in place, go ahead and ice them with some buttercream. I've only decorated these with glitter, but of course you can add sprinkles, raspberry lollies or whatever you like!

I quite like the simplicity of plain cream icing : ) 

Buttery, glittery cupcakes.

Thursday 22 August 2013

Prawn, chilli and cherry tomato risotto

A tasty risotto with a bit of a kick.

I made this risotto for Mum and Dad tonight and it worked out well. I posted the recipe on Facebook the first time I made it, but here it is again. 

It assumes that you already know how to make a basic risotto. If not, google it. (Don't use parmesan for this recipe though.)

Ingredients
1 cup arborio rice 
2 cups fish stock 
2-3 cups chicken stock (always have extra stock at hand)
Olive oil
Butter
Sangiovese verjuice (Maggie Beer)
250g raw prawns, heads and tails removed, etc 
1 punnet of cherry or grape tomatoes, sliced in half 
1 red chilli 
A few stems of continental / Italian / flat leaf parsley 
Handful of rocket 
Half an onion, diced 
Zest of half a lemon 
Juice of a quarter of a lemon 
Sumac, dried, to taste 
Garlic, diced, to taste 
Salt, to taste
Black pepper, to taste

Method
This is somewhat haphazard... stick to the risotto basics, time things well, taste the mixture regularly and you should be right!

  • Onion, chilli and lemon zest in first with the oil and some butter.
  • Rice in next once the onion is soft. 
  • Add verjuice, swish it around a bit. 
  • Start on the stock once the verjuice reduces. 
  • As the risotto forms, start adding in the lemon juice / sumac / garlic / pepper to taste. 
  • Meanwhile, pan fry the prawns on a low heat until they are just cooked through and lightly golden. Throw them in. 
  • Chuck in the tomatoes at some point. You want them ideally to be soft but still intact. Keep on stirring. 
  • When the rice is *almost* perfect, add in a bit more butter, stir it through and take the pot off the heat. 
  • Put on the lid and let it rest for several minutes. 
  • Mix the parsley with the rocket; get rid of the stems.  
  • Once the risotto is sufficiently rested, stir through the greens (a few handfuls) until they are limp but still green. 
  • Garnish with a few parsley leaves and small pieces of rocket.

Rested, plated and ready to eat!

Tuesday 20 August 2013

Vanilla vanilla love heart glitter cupcakes

Hot pink iced and decorated vanilla cupcakes.

I like to make cupcakes in millions of different flavours, but there is something amazing about a simple vanilla cupcake with good buttercream icing. 

I am still working on my piping skills. My sister has her own cupcake business, so I am very lucky to have her ongoing advice. If you'd like to see her handiwork, or even order cupcakes or speciality cakes, her Facebook page is here

I use a recipe from The Hummingbird Bakery's cupcake book as the basis for all of my cupcakes. I then vary it as needed, eg: add cocoa for chocolate cupcakes, add handfuls of fruit for raspberry cupcakes, etc, etc. I also add in a bit of extra butter. You can never have too much butter. Fact. 

Today I made vanilla cupcakes. I used my standard mixture for the batter. My sister gave me a few extra tips on icing earlier this week. I can't reveal her secrets though! You'll have to ask her...

I will say re: icing that in order to get it to hold its form on the cake, always ice them when they're cool and make sure the icing is quite stiff. It should not fall off a spatula when you pick up a lump of it.

Cupcakes ready for icing.

As far as icing goes, the best way to learn on you own is to find some tutorials on YouTube. Then practice, practice, practice. It takes a while, but it is worth it. Also helps to have a sister who is a pro... ; ) 

There are tonnes of videos on not just piping itself, but also how to fill the bags, how to hold them and which tips create certain effects. 

Pink hearts, natural pink food colouring and edible pink glitter.

Decorating the cupcakes after icing them is definitely my favourite part. Especially when you get to use glitter. Edible glitter is available in speciality cake stores. It doesn't really photograph well but it looks amazing.

Cupcakes are a lot of fun to make, but also to share around. They seem to make people happy. At my last job, I took in three dozen for a morning tea, and they literally all disappeared before the boss had even had a chance to deliver his monthly update.

Great success!

Mmmmm... ready to enjoy.

Monday 19 August 2013

Beef hash with cherry tomato and avocado side salad

Feeding the family from what was in the fridge and pantry.

I'm still at my parents' house and I texted Mum to ask her if I was on chef duty again tonight. She said yes, and indicated that I should use the beef mince defrosting in the fridge. 

Hmmm... what to do? I put on the TV and there was Jamie Oliver throwing 500g of mince into a pan. Bingo!

I don't really understand exactly where this recipe comes from, but you can view it here if you're interested. 

My version was tweaked as I had to use the vegetables (carrots, zucchini and onions) and fresh herbs (oregano) that I had at home. Everything blended nicely though. 

I also made a salad, which was a bit of a challenge given that I only had tomatoes and avocados to go into it. However, some fresh vinaigrette (olive oil, lemon juice, lemon zest, sumac, garlic, salt and pepper), some inventive plating up and some pine nuts made it seem like an actual salad. And it tasted good too. 

Having a lemon tree in the yard is pretty darn handy at a time like this. I hand picked the lemons myself! 

I think it's good to use what's in the fridge rather than let it spoil. It obviously reduces waste, but also encourages creativity. I sort of made this up as I went along, which was fun. 


Salad from nothing.

Sunday 18 August 2013

Pan-fried handmade gnocchi with roast pumpkin, pine nuts and sage

Well worth the effort.

I'm staying with my family right now, so I'm making the most of having people to feed. Yes, I'm a FEEDER.

Today I thought I'd make gnocchi. I used a recipe by Jamie Oliver. It wasn't overly difficult and fun to make. Flour everywhere : )

Soft little parcels of goodness.

You can't really go wrong with the classic combo of pumpkin, pine nuts and sage. I thought I'd serve the gnocchi with this as it's yummy and also familiar for me. Didn't want my folks to go hungry due to dinner failure...

I also thought I'd pan fry the gnocchi just to make things a bit more interesting... and it turned out beautifully. Crispy on the outside and soft and fluffy in the middle. 

To serve, I placed the gnocchi in the bowl with the pumpkin, then sprinkled toasted pine nuts over the top. 

I then used a bit of melted butter mixed with olive oil and crushed fried sage to drizzle over the gnocchi. A bit of parmesan and some extra sage leaves made it complete. 

Definitely something I'll make again.

Saturday 17 August 2013

French raspberry and blueberry tart


A traditional French tart with a twist.

My family has had some happy news this week - my sister is engaged! In order to celebrate this important event, I decided to make a tart. As you do.

You can make this tart with any berries you choose. I've made one with strawberries before, and one with raspberries. This is my first time using blueberries, and also using more than one type of berry. 

I've also eaten a LOT of raspberry tarts in France; they are pretty much my favourite treat there. Yum yum yum. 

My recipe below has been cobbled together from the MasterChef website (pastry), a French cookbook I bought while travelling (crème pâtissière) and some information on the BBC GoodFood website (glaze). 

Hopefully it will all make sense. 


Equipment

22-24 cm loose bottomed round tart tin
Food processor
Rolling pin
Pie weights (or a dried pulse such as chickpeas)
Baking paper cartouche (for how to make one, click here; it's easy)
Electric mixer
Pastry brush
Palette knife

Ingredients

Berries
2-4 punnets of raspberries, blueberries or strawberries

Sweet shortcrust pastry*
1 cup plain flour, sifted
75g unsalted butter, diced, chilled
1/4 cup pure icing sugar, sifted
Pinch of salt
1/2 teaspoon vanilla paste
4 egg yolks (three for the mix, one for the egg wash)
2 teaspoons milk

Crème pâtissière**
4 egg yolks
6 tablespoons sugar
4 teaspoons vanilla sugar
4 tablespoons flour
2 tablespoons kirsch (artisan distilled cherry schnapps)
400ml milk

Glaze
6 tablespoons berry jam
2 tablespoons kirsch


Method*

Berries
  • Remove the berries from their punnets and place in a small colander or seive. 
  • Rinse, then place on paper towel or a tea towel to absorb the excess water. They need to be dry by the time you add them to the tart. 

Berry preparation.

Pastry*
  • Preheat oven to 180°C (160°C fan-forced). (You may wish to do this later on as there are several steps to create the pastry case)
  • Lightly grease the tart tin.
  • Place all pastry ingredients except for egg yolks and milk into a food processor. Process mixture until it resembles almond meal or breadcrumbs. 
  • Remove from processor and transfer to a bowl, making a well in the centre. 
  • Place three of the egg yolks into well, then using your hands, work egg yolks into crumb mixture until just combined.
  • If the mixture is too dry, add some extra butter. 
  • Form dough into a ball and place in a clean bowl, then wrap with plastic wrap and refrigerate for 20 minutes.
  • After refrigeration, place pastry on a lightly floured work surface. Using a lightly dusted rolling pin, start to evenly flatten dough, keeping it as round and neat as possible.
  • For a helpful pastry-rolling tutorial, click here.
  • Rotate the pastry as you roll it, until it is approximately 3mm thick. 
  • To check if the pastry is the correct size for the tart tin, place the tin over the pastry. There should be a decent overlap of a few centimetres the whole way around. 
  • Carefully line the tart tin with the pastry. If the overlapping pastry is quite heavy, trim it off before you attempt to push the pastry down into the corners of the tin.
  • Don't be afraid of your pastry! If you make a hole, you can patch it up. Get a bit of excess pastry and wet it with milk or egg, and gently repair the hole. Wipe a bit of flour over it and you'll never know it was there. 
  • When the pastry edges are in place, push down on the edge of the tin to "chop" off the excess (ie: the edge of the tin will cut the pastry very neatly for you). Excess pastry can be rolled into a ball and frozen for future use.
  • Place tart tin in the refrigerator for 15 minutes. 
  • Next, blind bake the pastry case. Line base with your cartouche then fill tart shell with pie weights or a dried pulse.

Blind baking.

  • Place tart tin on a tray and bake in oven for 15 minutes. 
  • Your kitchen should start to smell amazing!
  • Remove tart tin from oven, check pastry is lightly golden before removing weights and baking paper. Leave the oven on.
  • Use the edges of the cartouche to lift out the weights once they have cooled a bit. 
  • Put your cartouche into a ziplock bag and save it for next time.
  • Combine remaining egg yolk and milk in a bowl and brush pastry well with the mixture, before returning to oven to cook for a further 10 minutes or until golden. 

Completed tart base.

  • Remove tart from oven, allow to cool completely.
  • While your pastry is cooling, you can begin the crème pâtissière.

Crème pâtissière**

  • Place the egg yolks, sugar and vanilla sugar into a bowl. Beat with an electric mixer until light and fluffy.
  • Gradually add in the flour and kirsch, bit by bit.

L'ingrédient secret.

  • Heat the milk until it is just below boiling in a small saucepan, then pour into the mixing bowl. Stir quickly until it becomes a smooth cream.
  • Poor this into a clean saucepan and stir frequently but not constantly over a low heat until the mixture thickens. 
  • Don't worry if you get lumps - just keep stirring. Make sure you scrape down all of the interior of the pot or else the mixture will congeal on the bottom. 
  • Once it has thickened, take it off the heat before it can reduce too much.
  • Leave the crème to cool completely. It will continue to thicken as it cools. Stir occasionally to ensure it stays smooth.
  • While it's cooling, grab a teaspoon and have a taste. Miam!

Assembling the tart
  • Pour the crème pâtissière into the pastry case. Spread evenly.
  • Arrange the fruit on top of the crème; normally this would be done in concentric circles starting from the outside working in.
  • If you're using strawberries and they're different sizes, cut them so that they're approximately the same size. 
  • Pack the berries in as tightly as possible.

Tongs can help arrange the berries evenly.

If you're making a heart shape like I did, it's probably best to have a "dress rehearsal". I actually used a heart-shaped egg ring as a stencil. (Don't ask me where you get a heart-shaped egg ring from.) 

Berry dress rehearsal.

Glaze***
  • To make the glaze, put the jam and kirsch in a small pan and bring to the simmer, stirring, until it lightly coats the back of the spoon. 
  • Pass through a sieve to remove the seeds and any chunks of fruit.
  • Using a pastry brush, gently brush the berries with the glaze.

Strawberry jam for the glaze.

Serving the tart
  • Once the glaze has cooled, your tart is ready to serve.
  • Check that the pastry is not attached to the tin around the edges. Gently prod the edges with a knife to separate the two there if is a connection at any point. 
  • Place the tin on an upturned glass and gently slip the edge of the tin off. 
  • Use a palette knife to remove the tart from its base, and place it onto your serving platter. You can actually leave it on the tart tin base if you're scared of breaking the pastry.

Bon appétit!

  • Slice, plate, enjoy! 
  • You can store the tart in the fridge overnight, however it is best eaten on the same day it's made. If you are pushed for time, you can make both the pastry and the crème pâtissière the day before. 

Mmmmmm...

Adapted from the MasterChef recipe.
** Translated from Desserts d'hier pour gourmands d'aujourd'hui, Editions OUEST-FRANCE.
*** BBC GoodFood Raspberry, lemon & frangipane tart recipe method.

Bucatini alla puttanesca

Southern Italian cuisine.

Tonight I made this yummy pasta from my Italian cookbook

Bucatini is basically hollow spaghetti. This gives the paste a really nice texture and a lighter feel than spaghetti.

Puttanesca is a mix of tomatoes, black olives, capers, sardines, oregano, chilli and the usual Italian basics; garlic, olive oil and onion. Despite there being several ingredients with quite strong flavours in this dish, none of them overrode the others. They all blended nicely to create a unique taste. 

Puttanesca translates as "whore's style spaghetti". Yes, really. It says so on Wikipedia. So it must be true. 

Ciao x

Thursday 15 August 2013

Baby eggplant, grape tomato and bocconcini wholegrain pizza


This pizza won't make you fat.

Welcome to my dinner. I wasn't going to bother to post it, as it's a bit basic, but then I got bored and started taking pictures and here we are. 

I like to make my pizzas on wholegrain Lebanese bread (until I finally learn how to make my own pizza bases). Not only are they higher in fibre and lower GI, they're also about half the calories of commercial white pizza bases. If you cook the pizza on stone, the bottom will be crispy. 

I'm also not a huge fan of tomato paste... I like to make my pizza sauce from a mixture of seasoned olive oil and crushed garlic. You can put almost anything on this base; it's especially good for more experimental pizzas (watch this space!). 

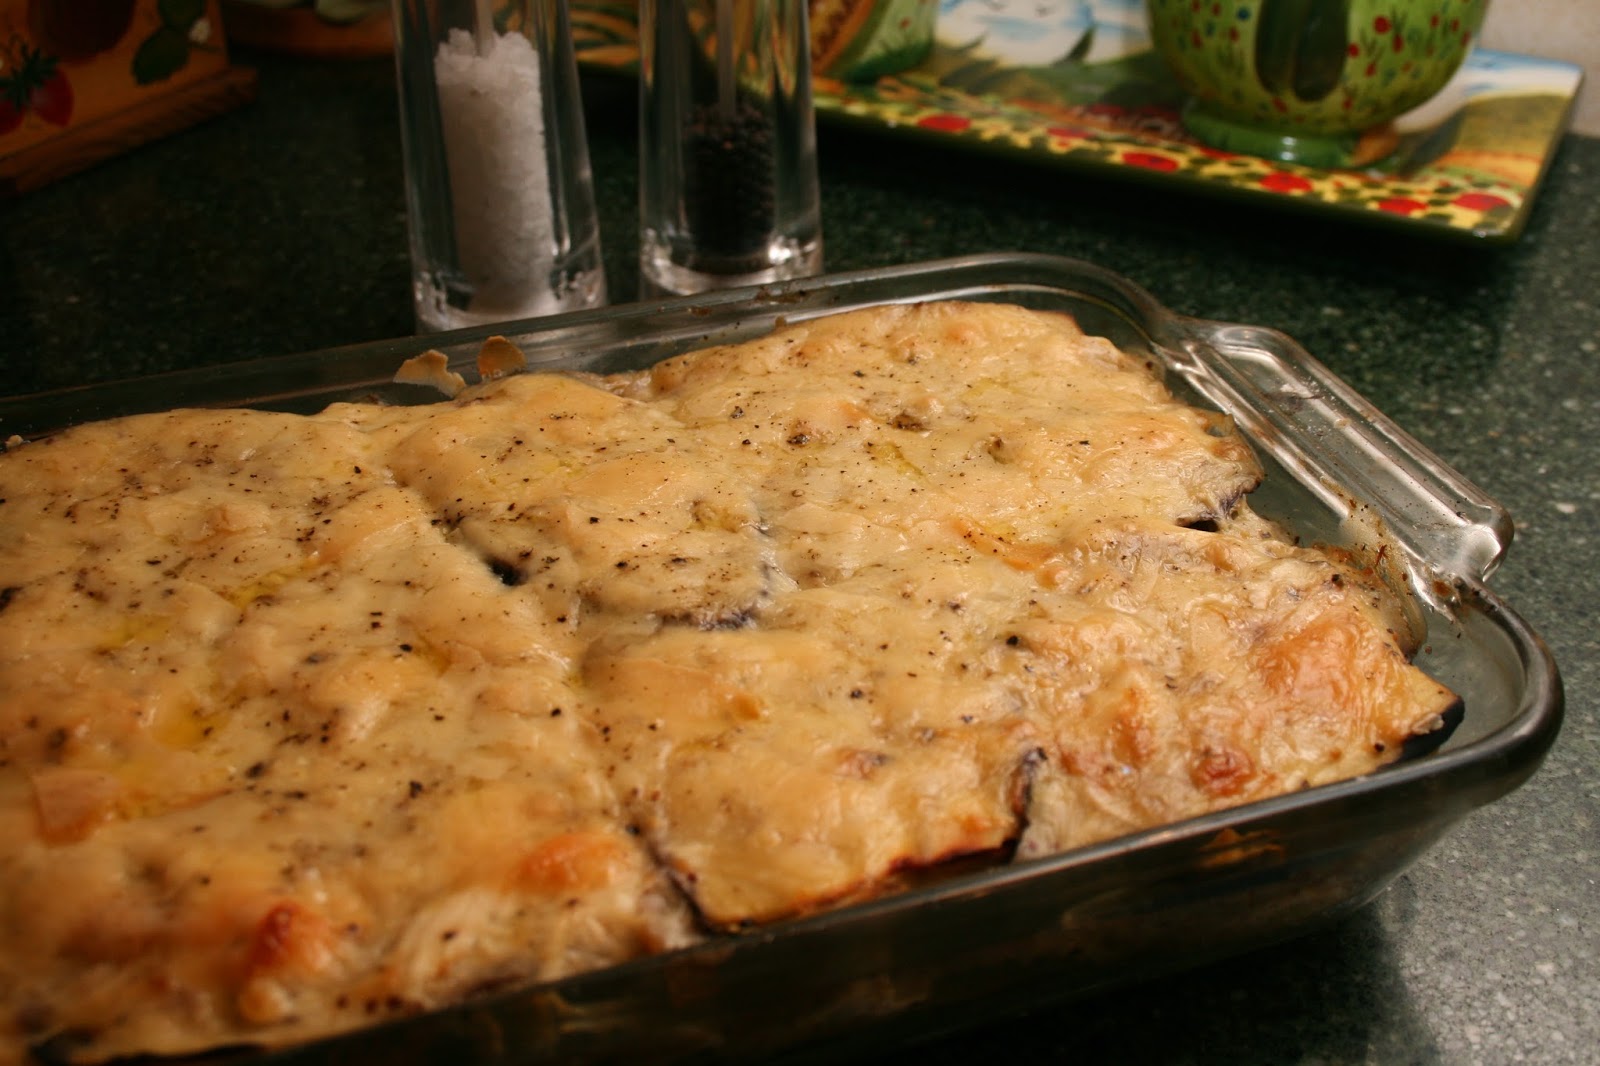
I think it's fairly obvious how to assemble this pizza from the photographs. There aren't any secret ingredients, just tomatoes, eggplant, baby bocconcini, parmesan, shallots, garlic, onion, salt and pepper. 

I will say though that it's best if you don't drop your eggplant on the floor whilst transferring it from the pan to the pizza. This is not an ideal outcome for your eggplant. 

Oh, and speaking of eggplant, I do have one tip - when pan frying it, add in a bit of lemon juice. This will add flavour and also lower the amount of oil that the eggplant absorbs. Don't be alarmed if it turns purple. Sometimes this happens, sometimes it doesn't. 

Pizza when removed from the oven.

I like to add some greenery to my pizzas. It gives them a nice fresh vibe and adds some extra texture and flavour. For this pizza I chose to add baby spinach and flat leaf parsley. These choices were largely based around what I had in my refrigerator. 

I hate how fresh herbs only come in huge bunches; it seems such a waste. Hence, I'm putting this parsley on pretty much everything. It has a pretty amazing flavour so that's ok. A tip to keep herbs fresh for longer is to place the bunch in a glass of water, then cover it with a plastic freezer bag. 

I also added a drizzle of balsamic vinegar glaze to this pizza. This can also be used as part of your base if you want a bit more flavour. 

Pizza dressings.

I don't like my pizza to be cooked for too long. I take it out once the edges are crispy. I prefer the cheese to be melted rather than brown, but of course you could leave it in longer. 

That's pretty much it. Simple, fun and yummy. 

Dressed and ready.

Saturday 10 August 2013

Nasturtium, walnut and cherry tomato salad


Plating up is fun with flowers.

I know that urban foraging is a bit of a trend right now. I've never been keen to head into the woods, skipping, with an empty basket ready for toadstools. However, when I passed by some nasturtium during a walk yesterday, it caught my eye.

Apparently these flowers and leaves are quite trendy at the moment, as are edible flowers in general. My first experience of eating nasturtium though was when I was a little girl. My grandmother had a huge patch of it down the side of her house. She introduced me to the plant, and told me that you could eat the round, peppery leaves. 

I was somewhat skeptical, but I did have a nibble, and they have reminded me of her ever since. 

Both leaves and flowers are edible.

In the park yesterday, there was huge patch of nasturtiums growing wild. Some of the leaves were as big as teacup saucers. I picked three of these, and arranged them carefully in my carry bag. I also picked some smaller leaves. 

The flowers were a bit trickier (where was my Little Red Riding Hood basket when I needed it?). I had a 1km walk to get home and I didn't want them to get squashed. I'd been to the chemist earlier and had bought medication. I dumped the tablets into my handbag and filled the box up with flowers. (I'm quite sure there is some metaphorical value in that.)

I stopped at Woolies on the way home and bought cherry tomatoes and baby spinach, planning to make a salad. 

The flowers travelled well; when I got home I examined everything and found them all intact.

Perfect!

I washed everything, and then couldn't resist tasting them. I don't remember eating the flowers as a child, just the leaves, so I tried a flower. They taste quite peppery and a bit like... a flower!

There is also a little channel (which is apparently called a "nectar tube") at the back where they store their nectar. Unsurprisingly, this part of the flower was sweet. 

I used the extra large leaves to line my salad bowl, then in a separate bowl I added most of the flowers and all of the small leaves, the baby spinach, some flat leaf parsley that I found in the fridge, half the punnet of cherry tomatoes (sliced in half) and a handful of walnuts. 

I made a quick and simple vinaigrette - white wine vinegar, olive oil, lemon juice, salt and pepper. It was nice and tangy to compliment the slightly bitter taste of the flowers and leaves, and to add some zest to the milder taste of the spinach and walnuts. 

Lastly, I poured the vinaigrette over the salad, and used the remaining flowers as a garnish. Then I had to figure out how to use my SLR all over again and took no less than 59 photographs of the salad. 

How did it taste? Like a tangy, slightly crunchy sweet garden. The petals added a lovely and unusual texture. Yum. I'll definitely be raiding the park for more freebies in future.


My salad.

Welcome to my new blog

I had a brainwave today whilst out for a walk. I have blogged in the past about various things, and I kinda miss it. I've been cooking a lot lately - why not start a blog about food?

Apart from encouraging me to cook, the blog will also incorporate two of my other passions - writing and photography. Today I dragged my SLR out of the cupboard where it has been sitting for far too long, desperately hoping to be noticed. 

I love to cook. I find it extremely therapeutic. There is something about picking up my Füri East-West knife and carving through a tomato that relaxes me. Ok, maybe that's a bit weird, but each to their own. I also love firing up my Mum's handheld mixer from the 1970s and creating an amazing cake batter. 


Fresh strawberries ready for a tart.

I'm not an expert at cooking. It's just something that I've recently grown to love and explore over the past few years. 

My first experience with food was when I was very young, baking cookies with my grandmother. We'd make dozens at a time, and each was christened with a glacé cherry or a chocolate freckle on top. I've always felt comfortable with baking and I think this has given me a solid base to draw on.

I didn't really cook much until recently, though I used to now and then on a whim. I remember making corn fritters when I was a kid, muffins as a teenager and pumpkin soup in winter when I moved out of home. 


Fresh sage from my garden.

When I turned 30, and found myself living alone, it was time to learn to cook properly. I had no idea what I was doing. Slowly but surely, over the last five years, I have built up my knowledge, and cooking has gone from being a necessity to a passion and a form of unexpected therapy.

I've always been surrounded by great cooks, cooking for me, so I have paid attention over the years. A lot of my friends have been foodies. My mum, sisters, grandmother and great-grandmother are (or were) all gifted in the kitchen so it must be in the genes as well.

I like to experiment with food. I'll learn how to make something from a recipe, get it right, then start to get creative. I don't think that quantities are important in recipes unless you've never made it before, or there is some sort of alchemy involved (ie: risotto, cakes). 


Vanilla cupcake.

I have some huge gaps in my knowledge so my creations are somewhat random. I'm a perfectionist so it's important to me that everything is exact. As a result, I can cook a perfect risotto, but I'm rubbish at cooking plain rice. (I'll keep working on the latter.)

At the moment, I like picking up new ingredients and seeing what I can do with them. Some of the new foods I've looked at lately have been fennel, Thai basil, pomegranate, white anchovies and real French crème pâtissière. 

I have about a million other things I want to learn; spatchcock, roast lamb and these amazing French custard chocolate pastry things I ate in Paris. I have a massive list of cupcake ideas as well; you'll see a lot of those on here.

So... bon appetit! x